|
by Scott Hesse  The process of training your ear for harmony is ongoing. Sometimes in order to hear more, you have to practice an idea from every angle. That's the idea with the progression below. It's based on a minor 2nd chord cycle, but a little different than the one we looked at before. This time the cycle doesn't include the V-I relationship and just ascends chromatically. The twist in how this is accomplished, however, is the voice leading. The chord voicings actually start very high on the fretboard and descend in range. At the same time, the key centers actually ascend chromatically. This gives a bit of implied counter point to the progression. Moving the harmonies in this fashion can be difficult because they seem to progress against your ear's expectation. That's a good reason to practice this: it will train you to hear differently, or in a more expanded way. 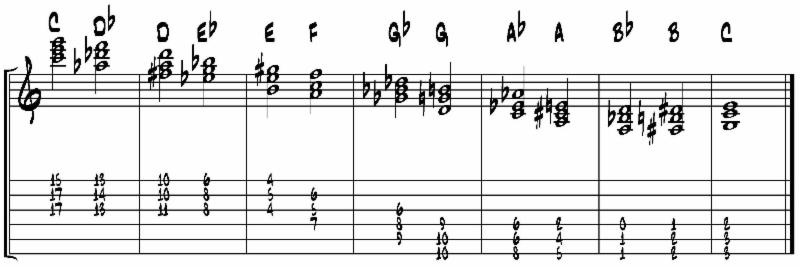 When you improvise or compose, your ability to hear from any direction allows you to be freer with your expression. The exercise above is just one of many ways to break down this or any other chord progression. Experiment as much as possible and find ways that catch your ear. Remember, any of these chord cycles can be used as substitutes for other standard changes.
If you have questions or comments, please post below. Happy practicing!!
2 Comments
by Scott Hesse  The last few Guitar Notes have dealt with the subject of chord cycles. This study of cycles has always fascinated me because there are so many different ways harmonically to get from one point to another. The crux of most music is made by a tonic chord moving to its tension chord (usually a dominant chord), and back again. Even when harmony is static, oftentimes the melodic portion of music will imply the same I-V-I relationship within the line. With melody in mind, I've used another chord cycle below to show how I might approach this tension/resolution (V-I) idea linearly. The Minor 3rd Chord Cycle is one of my favorites because of its beautiful and unexpected harmonic twists and turns. In practicing this progression, I would first repeat just the chords over and over. Try to place them in as many positions on the guitar as possible. Finding the chords all over the neck gives me different positions where I know I can find all the chord tones. It expands my reach both visually and aurally. The melodic line is fairly simple. I didn't really deviate from the actual harmonies much more than adding a little chromaticism here and there. You can also see that I keep the majority of the line on the D and G strings. The positional moves on the fret board go with how the chords are moving. It's all about the connection between melody and harmony.  Another way to use this progression both melodically and harmonically is to substitute, or superimpose, this progression over another. For instance, if you were playing on a more standard chord progression like |Cmaj7 | A7 | Dm7 | G7 |, the Minor 3rd cycle works. Use the progression above in place of the standard harmonies. This superimposition of harmonies is done frequently by improvisers. It's a good way to get this tension/resolution into your playing in an organized way.
Experiment with this idea as much as possible. It will open your playing in many ways while allowing you to evolve your harmonic/melodic approach. Feel free to post any questions or comments below. Happy practicing!! by Scott Hesse  This is the second installment in a series of tips on Chord Cycles. The first one dealt with a melodic voice-led approach to the harmonies. This time, I want to take a bit of a different approach. First of all, I'm using a Major 2nd Chord Cycle below. What that means is that the tonic keys (the Major 7th chords in this case) are all separated by the interval of a Major 2nd. I connect each tonic key center by preceding it with a dominant chord. To color the dominant chords up a bit, I use the extension of a ninth. Also, note that the way I put the exercise together is very uniform. The arpeggio pattern is the same through every key center and ends when you return to the CMaj7 again. More uniformity exists in the fingering pattern as well. A look at the tablature notation reveals the same finger pattern throughout. The Major 2nd Chord Cycle: 
Again the idea behind this exercise is to train yourself to hear different possibilities for harmonic cadence. You also need to be able to sight the various chord tones on the neck in different ways. This particular cycle (when broken in to segments) happens in lots of tunes as a I-vi (VI)-ii (or II) progression.
Even though I have this exercise set up as I do, there are many, many ways to take this apart and reconfigure with different sequences. I really don't mean for this to be about technique, but more about sound exploration. Use your ears to suggest other ways of hearing this chord cycle. A great way to start yourself toward that end is to write a piece of music based on the chord cycle. It could be the whole cycle, or just pieces of it. As always, take your time to find your own way through it. Happy practicing!! By Scott Hesse  If you want to learn to improvise better in any style, you must understand how harmonies move. Over the course of the next two or three tips, I'm going to cover several different chord cycles. The aim is to help you internalize certain root movements in order to get more inside a given harmonic sequence. Once you're comfortable with certain tendencies of root movement, you can be free to reinvent the harmonies in different ways while improvising. The basic chord movement for almost any song is I-V-I. It is tension and resolution in its simplest form. What I've done in the example below is taken a series of 'I' chords that move to 'V' chords of the next key. The resolution chords ('I' chords) move up in minor second intervals and are preceded by their 'V' chord. This chord cycle is therefore known as the minor 2nd chord cycle. Seeing the root movement is important, but hearing the relationship is even more so. In order to really hear through the chord changes, I've written a particular harmonic/melodic pattern to use over the root movements. The pattern is the same throughout the key changes but modulates as the key centers move. I put the pattern on the top two strings, but this could be done on the G/B string set or the D/G string set as well. Be aware that if you start the pattern on the D/G string set that you may run out of room on your fretboard to complete the exercise. The Minor 2nd Chord Cycle: 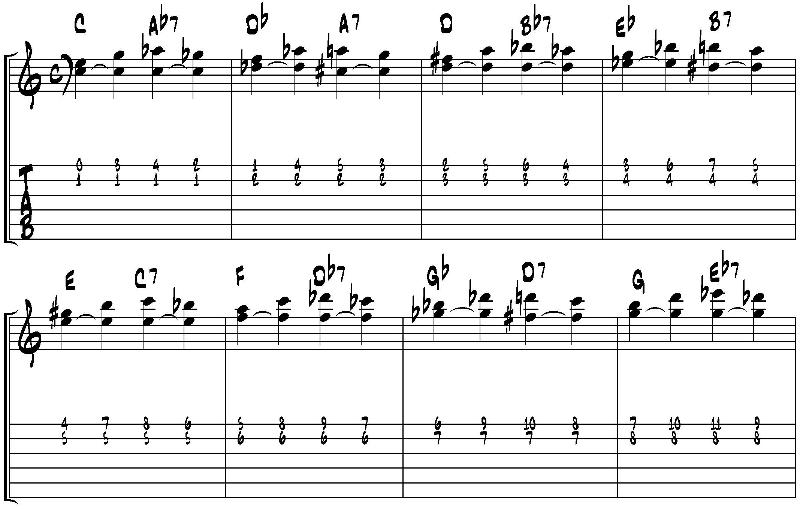

Once you get the basic harmonic/melodic pattern down, you might want to attempt the chord changes in a variety of places throughout the fret board. You can also use the chord progression itself as a template for playing the particular arpeggios. See if you can find this chord cycle in any tunes you're listening to now, or might know from the past.
Next time, we'll look at the Major 2nd chord cycle. Happy practicing!! By Scott Hesse  Ok, for this last installment on intervallic picking exercises, we're going to really get in to it. The other three tips dealt with the exercise in its base form which is great as it is. Now I want to add even more application to this exercise. What I've written below is, sequentially, the intervallic picking exercise. Remember that I'm using three consecutive notes of the same interval. So you have three (ascending and descending) m2s in a row followed by three M2s followed by three m3s and so on. This next evolution adds another layer of notes to the existing pattern. In the first measure where you see m2s, I've taken the original three ascending minor m2nd intervals (C, C#, and D) and used them as starting points for a particular pattern. In this case, I use the interval of an ascending m2nd. I assign each of my original starting notes an ascending m2nd to come up with the new pattern you see in the first measure. Each of the ever-expanding interval choices is treated the same way resulting in one big pattern.   This pattern can be broken into much smaller pieces for further study. I highly recommend it, as a matter of fact. Make sure to keep in mind that each one of these pattern-sets can be fit over a certain harmony.
For example, if I isolate the m6 set I get this note sequence: C, C#, Ab, A, E, F. As it is sequentially, it would sound great over a C13(b9), and FMaj7(#5), Dmin(Maj7), DbMaj7(#5), AMaj7(#5), Bm9(b5), etc. You can also tell this set is the inversion of the M3rd set. It's just a different way to approach it with bigger leaps. If you want to get those kinds of interval sounds in to your playing, you have to work on them. You have to hear them. Use this exercise to train yourself to hear what you want to hear. Happy practicing!! By Scott Hesse  For this, the third installment of Intervallic Picking exercises, I want to further the challenge. The first exercise took three successive notes in ever-widening intervals and ascended through an octave. Then, last time, I reversed the exercise and had you descend through the ever-widening intervals. This time you'll combine the ascending and descending intervals into a longer, more challenging exercise. The idea is the same: hone your technique while training your ear to hear all the different interval combinations. What you find in the illustration below are all the various intervals from a minor 2nd up through a major 7th. As you can see, you ascend through the first three intervals of each type then descend the same interval type from an octave above.  Each combination of ascending and descending intervals can become its own exercise. As you know, I'm a big advocate of breaking bigger exercises into smaller ones to get a better handle of them. In fact, that's how I conceived this whole exercise sequence in the first place. Maybe you just want to isolate moving from the m6 sequence to the M6 sequence above. That could be an exercise of itself. Listen closely to how each interval pattern strikes your ear. Whatever sounds interesting to your ear should be your inspiration for further exploration.
Happy practicing!! By Scott Hesse  Last tip, I gave you a picking exercise that used ascending intervals in ever-widening fashion. This time around, I will show the same thing using descending intervals. The example below shows you the starting point of C two ledger lines above the staff. As I said in the last Guitar Notes, the fingering I give is how it fits best for my technique. You can use what I show as a starting point, or find a way that fits the way you play. However you decide to do this, make sure you start slow and build your speed up gradually. Also, really pay attention to the way these intervals sound as you play them. On some of the wider-spaced intervals, I like to just stay on them for a while and get comfortable. Everything we do when we practice trains our ears to hear music on a deeper level. So remember that what you hear now is more than what you heard a year ago. What you hear a year from now will be better and deeper than what you hear today.  The last thing I'll say about this is something I've suggested before in these tips. Once you're relatively comfortable with what's given, find a different way to practice this material. Break it into smaller pieces and make an exercise of that. Or put on a different starting point. Whatever you do, make any exercise you get into something of your own.
Happy practicing!! By Scott Hesse  I like to work on exercises that accomplish several things at a time. The tip for this time involves a warm-up exercise I like to do. It's good for keeping the mechanics of the right and left hands like a well-oiled machine. But it's also a great ear training exercise. The idea is to take three consecutive notes of each interval type (m2nds-P8s) and play them as a continuous, ever-expanding exercise. As you see below in the example, I start the exercise on the note C and play C-C#-D-C# for the minor 2nds portion. Then it goes on to the Major 2nds (C-D-E-D) and continues through the rest of the bigger and bigger intervals.  The fingerings I use are based on the way I break the guitar down with regard to my right hand articulation. So depending on how you pick, whether you pick every note, or just a portion of them, the fingering can be different. The most important thing is that you know how you want to put exercises like this together technically. That's yet another good reason to practice something like this: it will help you define how to execute certain technical maneuvers.
The string skipping and position jumping is difficult to do, so do this slowly and evenly with a metronome. Then keep inching the time up as you become more comfortable at higher tempos. Happy practicing!! |
Guitar NotesHey, Friend! Welcome to Guitar Notes, practice tips and exercises for the progressing guitarist. I am passionate about music and all the possibilities for growth that come with an in-depth study of music. Even more, I am committed to sharing what I know to help YOU find a deeper awareness of your own possibilities as a musician. Here you will find a growing archive of the tips I send by email every other week. (Click the link below to sign up.) Archives
January 2016
|
 RSS Feed